Currently Empty: $0.00

Safe Lifting and Load Carrying Practices for Tri-Loader Operators
Tri-loaders are useful for moving soil, aggregate, pallets, and landscaping materials through confined construction areas where larger equipment may struggle to maneuver. However, lifting a load that exceeds the machine’s rated capacity, using an improperly secured attachment, or traveling over soft and uneven ground can quickly compromise stability. Safe material handling also requires protecting pedestrians and keeping clear travel routes around active work zones.
Rated operating capacity, attachment weight, quick-attach locking mechanisms, load position, and ground conditions all influence lifting performance. Loads carried too far forward increase the overturning force, while raising them during travel raises the machine’s center of gravity and reduces stability. Fork attachments must be compatible and fully secured, and the operator needs a clear view of the route or a trained spotter when the load obstructs visibility.
Safe operation begins with checking the capacity rating for the installed attachment, confirming that all locking pins are engaged, and securing loads close to the machine. Operators should travel with loads low, reduce speed before turning, and avoid soft ground or slopes that could affect balance. Barriers, pedestrian detours, daily inspections, and clear communication help protect nearby workers and the public throughout material handling operations.
Confirming Rated Lifting Capacity
Every safe lift starts with one question: how much can this machine safely carry in its current setup? The answer isn’t a single fixed number. A tri-loader’s rated capacity depends on the attachment installed, the position of the load, the lift height, and the operating conditions. Operators should check the rated capacity for the installed attachment and intended configuration before lifting anything.
Manufacturers usually list capacity in the operator’s manual and on a decal or capacity chart near the operator station. Read both, and confirm that the figure you’re using matches the attachment on the machine. A capacity listed for a bucket doesn’t automatically apply to pallet forks, a grapple, or another tool. Each attachment has its own weight, and that weight counts against the machine’s total capacity. Attachments also hold the load at different distances from the machine. Pallet forks often carry the load farther forward than a bucket does, which gives the load more leverage against the machine and can reduce the weight it can safely handle.
Load position matters for the same reason. A load carried close to the attachment and centered on it puts less leverage on the machine than the same load carried at the tips of the forks or hanging off one side. Lift height matters, too. As the load rises, the machine’s combined center of gravity rises with it, and stability margins shrink. Some capacity charts show different ratings at different heights or reach positions, so check the chart for the full range of motion you plan to use.
Loads must remain within the manufacturer’s limits rather than being judged by appearance alone. Materials that look similar can weigh very different amounts. A pallet of retaining wall block, a bag of wet mulch, a scoop of damp clay, and a pallet of pavers may each be much heavier than their size suggests. Moisture adds weight quickly, so soil or mulch that loaded easily on a dry morning can become an overload after overnight rain. Get the actual weight from delivery tickets, pallet labels, bills of lading, or the supplier. When the weight is unknown, don’t guess. Split the load into smaller portions, or wait until you can confirm the number.
Watch for warning signs during every lift. If the rear of the machine feels light, the steering becomes sluggish, or the lift arms rise slowly or strain, the load may be too heavy or positioned too far forward. Lower the load to the ground smoothly and reassess before continuing.
Key takeaway: Rated capacity depends on the installed attachment, load position, lift height, and operating conditions, so check the manufacturer’s capacity information for your exact setup and confirm actual load weights rather than judging by appearance.
Working Around Other People
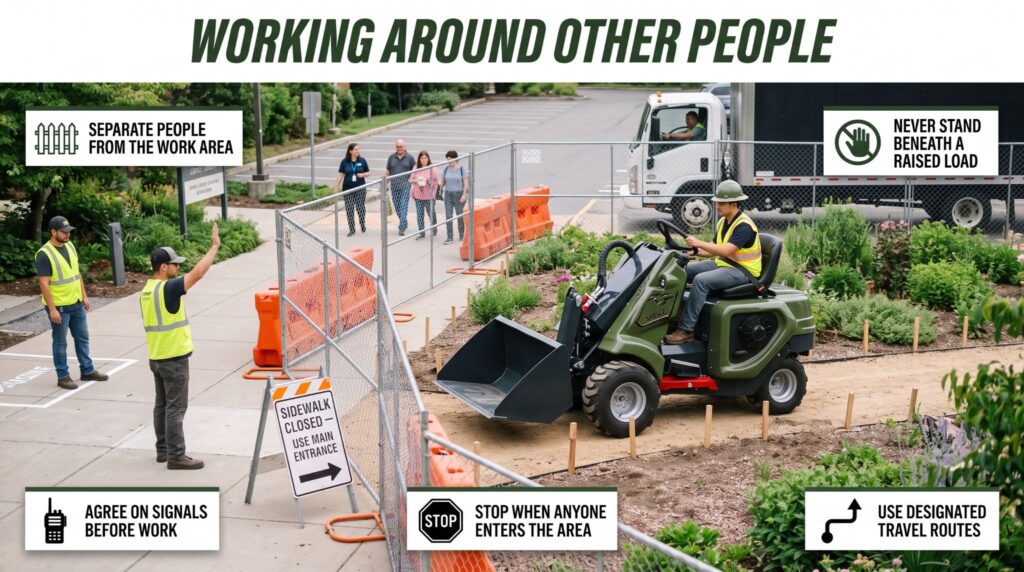
Tri-loaders often operate near ground crews, delivery vehicles, and the public, where limited visibility creates serious risks. Clear work zones, safe operating practices, and effective communication help prevent accidents and injuries.
- Separate People and Machines: Use barricades, cones, fencing, and signs to keep pedestrians away from operating areas. Arrange separate routes for workers and machinery wherever possible.
- Maintain Safe Distances: Keep people clear of the machine’s travel path and attachment. Never allow anyone beneath a raised load or use attachments to lift or carry people.
- Coordinate Ground Crews: Stop the machine and lower the load before allowing workers to approach. Ensure the operator acknowledges them before work resumes.
- Use Clear Communication: Agree on hand signals or radio calls with spotters and ground crews. Establish travel routes, loading points, and waiting areas before starting work.
- Protect the Public: Coordinate with property owners or site managers to control foot traffic. Stop all machine movement if children, pets, or unauthorized people enter the work zone, and resume only when the area is clear.
Key takeaway: Separate pedestrians from the machine’s operating area with barriers, routes, and scheduling, never allow anyone beneath a raised load, and use clear communication and designated travel routes to prevent collisions and unexpected entry.
Maintaining Machine Stability
A tri-loader’s compact size gives it access to tight spaces, but that size also means stability needs constant attention. Stability depends on the load, the combined center of gravity of the machine and load, the machine’s configuration, the ground conditions, and how the machine moves. When any of these factors changes, the machine’s balance changes with it.
Every machine has a stability area, the zone within which its combined center of gravity must stay for the machine to remain upright. On a three-wheeled design, that area takes the shape of a triangle formed by the wheel contact points. As long as the combined center of gravity stays inside that triangle, the machine remains stable. When it moves outside, the machine can tip forward or to the side. Lifting a load, raising it higher, turning, braking, and traveling on a slope all shift the center of gravity, sometimes several of them at once.
Carrying a heavy load too high is one of the most common ways operators reduce stability without noticing. Raising the load lifts the combined center of gravity and makes the machine more sensitive to every bump, turn, and slope. A load that feels steady at ground level can make the machine tip when raised during a turn or across uneven ground, as the library crew discovered. Operators should transport materials in the carrying position the manufacturer recommends. On most compact loaders, that means keeping the load low and the attachment tilted back slightly so the material stays cradled. Raise the load only when the machine is stopped and positioned for placement, and lower it before moving away.
Ground conditions deserve the same attention. Soft lawns, wet soil, fresh fill, loose gravel, holes, and curbs can let a wheel drop suddenly and tilt the machine. Slopes add another force pulling the center of gravity downhill. Follow the manufacturer’s guidance for slope operation, which may specify travel direction, maximum grades, and whether turning on a slope is permitted. Avoid side slopes with a load whenever possible. Where the ground is soft, lay plywood, ground protection mats, or another firm surface to spread the load and keep wheels from sinking.
Smooth operation protects stability. Avoid abrupt steering, sudden braking, and quick starts, since each one throws the load’s weight in a new direction. Fasten the seat belt or operator restraint every time you operate where the machine is equipped with one, since the protective structure only works for an operator who stays in position. If the machine starts to tip, follow the manufacturer’s guidance for that situation. Never try to jump clear.
Key takeaway: Stability depends on the load, center of gravity, configuration, ground, and movement, so carry loads low in the manufacturer’s recommended position, avoid abrupt steering and braking, and follow the manufacturer’s guidance for slopes and soft ground.
Positioning and Securing the Load
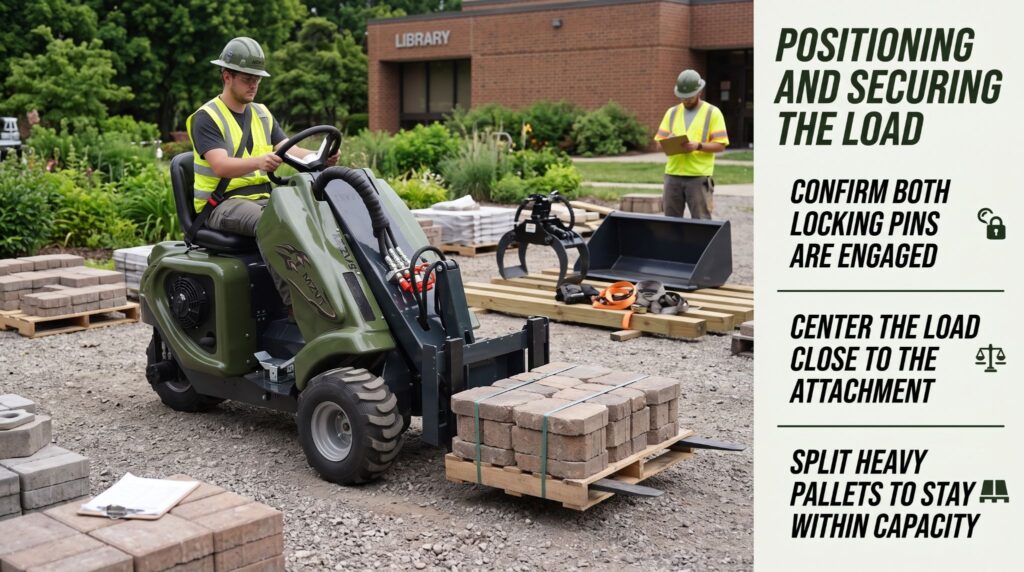
Once you know the load fits within capacity, the next step is placing it correctly on the attachment. Materials should be positioned securely and distributed to keep them from shifting. A load that slides, rocks, or tips during travel can change the machine’s balance in an instant and fall onto the ground, the machine, or a person nearby.
Different materials call for different tools. Pallets of block, pavers, sod, or bagged products generally suit pallet forks. Loose landscaping materials such as soil, mulch, gravel, and sand usually belong in a bucket. Logs, stumps, rocks, and brush are often better handled with a grapple or another approved attachment. Using the wrong tool, such as balancing loose material on forks or prying a rock loose with the edge of a bucket, invites shifting loads and damaged equipment. Use only attachments approved by the manufacturer for your tri-loader, and choose the one that fits the material.
On forks, insert the tines fully under the pallet whenever its size allows, and keep the load as close to the attachment as possible. Set the forks as wide as the pallet allows so the weight rests evenly on both tines. Center the load from side to side. Before lifting, confirm that banding, shrink wrap, or straps are intact, and secure loose items that could slide. If a pallet is damaged, broken, or stacked unevenly, restack or repair it before lifting. When carrying a partial pallet to stay within capacity, arrange the remaining material in a stable, even layer rather than leaving a tall stack on one side.
In a bucket, load material evenly and avoid heaping it high above the edges. Overfilled buckets spill during travel and can drop material onto the route or onto people. Dense materials such as wet soil and gravel can reach rated capacity long before the bucket looks full, so fill to a level that respects the weight limit.
The attachment itself must be secure before any load leaves the ground. Operators should confirm that the attachment is correctly installed and locked before lifting. On a quick-attach system, that means fully engaging both locking pins or levers according to the manufacturer’s procedure, then checking them visually. Many operators also tilt the attachment slightly with it resting on the ground to confirm a solid connection. Clean mud and debris from the coupler and mounting points before connecting, since packed material can keep a pin from seating. An attachment that isn’t fully locked can separate from the machine under load, which is one of the most dangerous failures a tri-loader can have.
Key takeaway: Choose an approved attachment that suits the material, position loads close to the attachment and centered, secure anything that could shift, and confirm that the attachment is fully installed and locked before every lift.
Daily Inspection and Safe Shutdown
Safe lifting depends on a machine in sound condition. Before lifting, operators should complete a pre-operation inspection that confirms the tri-loader is ready for work. Damaged components can affect load control even when the load is well within rated capacity.
Start the inspection with the machine parked on firm, level ground, the attachment lowered flat, the parking brake set, and the engine off. Walk around the machine and inspect the tires or tracks for cuts, uneven wear, damage, and correct inflation, since a low or damaged tire can tilt the machine and reduce stability. Examine the lift arms, pivot pins, and attachment plate for cracks, bends, loose hardware, and excessive play. Check the quick-attach locking pins or levers to confirm that they move freely, engage fully, and aren’t bent or worn. Inspect forks, buckets, and grapples for cracks, bent tines, worn cutting edges, and damaged mounting points.
Hydraulic components deserve close attention. Look for leaks, abrasion, bulges, and kinks in hoses, and check fittings and cylinders for dampness or fresh oil. Never search for a hydraulic leak by running your hand along a hose, since pressurized fluid can penetrate skin and cause serious injury. Use a piece of cardboard instead, and wear gloves and eye protection. Check fluid levels according to the manufacturer’s procedure.
Then test the controls and warning systems. With the area clear, confirm that the lift and tilt functions move smoothly and hold position when released, that the steering and brakes respond correctly, and that the horn, lights, backup alarm, seat belt, and operator presence systems work as designed. Confirm that the capacity decal is present and legible. Defects that affect load control should be corrected before work continues. Tag the machine out of service, report the defect, and let a qualified technician complete the repair. Record every inspection and repair in a maintenance log so recurring problems are easier to spot.
Safe shutdown matters as much as safe startup. When parking, choose firm, level ground away from traffic, walkways, and slopes. Lower the attachment fully to the ground, set the parking brake, return the controls to neutral, and follow the manufacturer’s shutdown procedure. Remove the key before leaving the machine, especially on sites where the public may be nearby. Never leave the machine with a raised load or attachment, and never work beneath raised lift arms unless they’re secured with the manufacturer’s approved support. When changing attachments or performing maintenance, follow the manufacturer’s procedures for relieving stored hydraulic pressure.
Key takeaway: Inspect tires or tracks, attachment locks, hydraulic hoses, lift arms, controls, and warning systems before lifting, correct any defect that affects load control, and always lower the attachment, secure the machine, and follow the manufacturer’s shutdown procedure when parking.
Conclusion
Safe tri-loader lifting depends on following rated capacity limits, securing materials, maintaining stability, and controlling movement from pickup to placement. Operators should confirm the machine’s capacity for each installed attachment and use verified load weights rather than estimates to avoid overloading. Selecting an approved attachment for the material, centering the load close to the machine, and confirming that the coupler is fully locked helps prevent shifting loads and accidental detachment. Loads should be carried low in the manufacturer’s recommended travel position, with smooth steering, controlled speeds, and proper attention to slope limits to maintain stability. Before lifting, inspect the travel route for slopes, soft ground, holes, debris, and overhead hazards, using suitable ground mats where needed to protect weak surfaces. Plan a flat, direct route and stage materials near the work area to reduce unnecessary travel. When loads restrict visibility, use a trained spotter with agreed hand signals or radio communication. Barriers, signs, designated travel paths, and clear communication should keep pedestrians away from operating and lifting areas. Before each shift, inspect tires or tracks, attachment locks, hydraulic hoses, lift arms, controls, and warning systems, and confirm that all safety features function correctly. Check delivery tickets, pallet labels, or supplier information to verify load weights, and divide heavy pallets into smaller loads when necessary to remain within rated capacity. Coordinate with property owners or building staff and schedule heavy lifting during quieter periods where practical. Review the manufacturer’s shutdown procedure with every operator and secure the machine correctly after use. Consistent inspections, careful load handling, and clear worksite coordination help improve material-handling efficiency while protecting operators, nearby workers, and surrounding property.
Frequently Asked Questions
How can a tri-loader operator confirm a safe load?
Check the machine’s rated capacity for the installed attachment, the load’s actual weight, its position on the attachment, and the manufacturer’s operating instructions. Capacity can change with the attachment, lift height, and load position, so use the capacity chart for your exact setup. When the weight is unknown, split the load or confirm the figure before lifting.
Why should loads be carried low during travel?
A lower carrying position generally helps maintain stability and improves control, subject to the machine manufacturer’s guidance. Raising a load lifts the combined center of gravity, which makes the machine more sensitive to turns, bumps, and slopes. Raise the load only when the machine is stopped and positioned for placement.
Can a tri-loader lift any compatible-looking attachment?
No. Attachments must be approved for the machine and properly secured, and their weight and function must be considered. An attachment that fits the coupler may still exceed the machine’s hydraulic or lifting capabilities, and its weight reduces the capacity available for the load. Always confirm full engagement of the locking pins before lifting.
What should operators do if a load blocks visibility?
They should use a safe, approved travel method that maintains visibility, such as traveling in reverse where the manufacturer and site rules permit it, or arrange a trained spotter according to site procedures. Never raise a load to see underneath it, since that reduces stability. If the operator loses sight of the spotter, stop the machine.